Last updated on
In this comprehensive guide, you’ll learn the step-by-step process to naturally fix any sagging or broken springs in your couch, restoring the comfort and lifespan of your favorite seating area.
Key takeaways:
- Assess couch spring damage: sagging, noise, discomfort, visible breaks, tension.
- Gather tools: pliers, staple gun, screwdriver, upholstery needles, etc.
- Identify spring type: sinuous, coil, pocketed coils, elastic webbing, marshall.
- Reattach or replace broken springs: secure in place, measure for replacement.
- Test repair for stability and comfort: apply pressure, sit, listen, inspect.
Table of Contents
Assessing Your Couch’s Spring Damage
Begin by removing the cushions to visually inspect the springs; this can usually give you a clear view of any visible damage. Here are a few points to look for when assessing the condition of your couch springs:
- Sagginess: If the couch dips in certain areas, it may be due to stretched or broken springs.
- Noise: Listen for creaks or squeaks when sitting down or getting up from the couch, which indicate spring issues.
- Discomfort: Uneven support or feeling the springs while seated suggests that some springs may be broken or dislodged.
- Visible Breaks: Look for springs that are visibly out of place, bent, or broken.
- Tension: Check the tension of zig-zag or sinuous springs; they should be firm and snap back when pressed.
After a thorough assessment, you’ll have a better understanding of what repairs are needed. Remember to approach this step with caution to avoid any potential injury from sharp edges of the broken springs.
Required Materials and Tools for Fixing Couch Springs
Before getting started on any repair task, gathering the right materials and tools ensures efficiency and safety. For fixing couch springs, you’ll need:
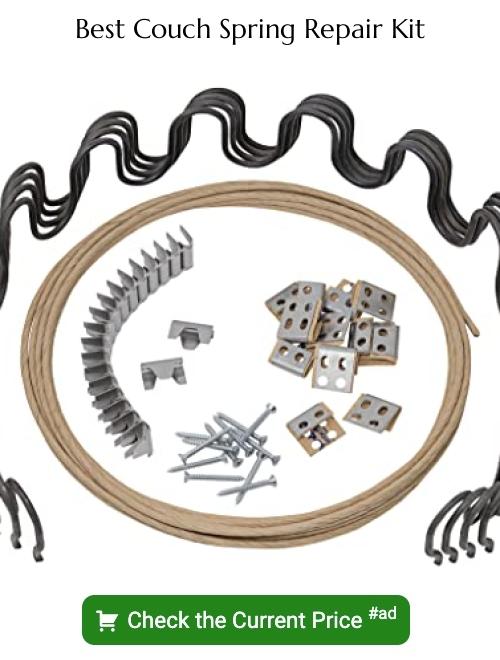
- Pliers: These will be your go-to tools for bending springs back into shape or removing them if necessary.
- Upholstery Staple Gun: A staple gun is crucial for attaching the springs securely back onto the couch frame.
- Staples: Ensure you have the correct size for your staple gun and materials.
- Screwdriver: A versatile screwdriver will assist with removing any screws that may be holding the fabric or springs in place.
- Upholstery Needles: Large, heavy-duty needles are needed for any sewing involved in repairing the couch fabric or spring covers.
- Upholstery Thread: Strong thread is a must for stitching that can withstand the pull and pressure of repaired springs.
- Scissors: A sharp pair of scissors will make cutting any fabric or twine much easier.
- Replacement Springs (if necessary): Match these to the existing springs in gauge and length for a consistent feel across the couch.
- Twine or Spring Clips: These are used for securing the new or repaired springs to the couch structure.
- Measuring Tape: Precision is key, so having a measuring tape on hand will help ensure springs are spaced correctly.
Each tool plays its role in a successful repair, from precision work with the pliers to the broad securing sweeps of the upholstery staple gun. With these items at your disposal, the actual repair process can be tackled with confidence.
Accessing and Identifying Different Types of Couch Springs
Before attempting any repairs, it’s crucial to know what kind of springs your couch uses. Flip the couch over or remove the bottom dust cover for a clear view of the spring system. Here are the most common types you might encounter:
- Sinuous Springs: Also called serpentine springs, they are S-shaped and run from the front to the back of the seat.
- Coil Springs: These are individual springs secured to the webbing or tying together to form a spring network.
- Pocketed Coils: Similar to those found in mattresses, these springs are individually wrapped and then connected.
- Elastic Webbing: This isn’t a spring but may be present in modern furniture as bands of elastic webbing, providing support.
- Marshall Springs: Constructed into individual units with a cover, they are less common in couches but found in older or more traditional furniture.
Identifying the spring type allows you to anticipate the repair needs and handle the structure appropriately. Each type will have a specific fixing method, so accurate identification is key to a successful repair.
Reattaching or Replacing Broken Springs
If you’ve identified a detachable spring that’s come loose, carefully hook it back into its fastening point on the frame. Use pliers for added grip and bend the end of the spring if necessary to secure it in place. For zigzag springs, ensure they’re evenly spaced and parallel to maintain proper tension.
In cases where a spring is broken, it will require replacement. Measure the old spring before removal to purchase the correct size. For coil springs, you will need to untie the supporting twine and remove the broken spring from its clips or fastenings. Install the new spring, then retie the twine in a cross-pattern over the spring to provide adequate support.
For a broken zigzag spring, release it from the clips at each end using pliers. Slide the new spring into place and snap it securely into the clips. Use a rubber mallet if necessary to minimize damage to the new spring or frame.
Always ensure that new springs are as close in tension to the existing ones to prevent uneven wear. After reattaching or replacing the springs, it’s vital to check that they’re all at the same height and tension to sustain the couch’s comfort and shape.
Testing the Repair for Stability and Comfort
Once repairs are complete, it’s crucial to confirm that your couch is stable and comfortable before considering the job done. Haste at this stage could lead to a short-lived fix, or worse, an unnoticed issue that could cause damage or injury later on.
Start by applying pressure to the repaired area with your hand. Push down firmly but gently to ensure the spring has resistance and returns to its original position. This mimics the cushion’s response to weight and assesses the spring’s functionality.
Next, sit on the couch to evaluate overall comfort. Shift your weight from one side to the other and note any unusual creaks, shifts, or sags. Unevenness can indicate that the spring tension might be off-balance or that a neighboring spring may also need attention.
Listen for sounds of metal scraping or popping. Any out-of-place noises suggest that the spring may not be properly secured or that there may be additional unnoticed damage.
Finally, visually inspect the area one more time. Look for any movement of the spring that seems excessive or any new stress points that could escalate if ignored. Confirm that all fastenings hold tight and that nothing has come loose during your testing.
Performing these thorough checks will help ensure the longevity of your repair and provide peace of mind that your couch is ready for regular use again.
FAQ
Can sofa springs be fixed?
Yes, broken sofa springs can be fixed either by reattaching them to the wooden frame using twine or wire, or by entirely replacing the stretched-out ones.
Why is my couch sinking?
Your couch is sinking due to constant pressure exerted on its cushions from daily use, usage of low-quality foam, and unequal weight distribution from repeated sitting in the same spot.
What are the necessary tools for sofa spring repair?
The necessary tools for sofa spring repair include needle-nose pliers, a staple gun, screwdriver, upholstery needle, and a pair of safety goggles.
How often should couch springs be replaced for optimal comfort?
Couch springs should ideally be replaced every 5 to 10 years for optimal comfort, dependent on usage and quality of the springs.
Is it cost-effective to repair sofa springs or replace the entire couch?
The cost-effectiveness of repairing sofa springs or replacing the entire couch depends on the quality of the sofa, the extent of the damage, and the cost of the replacement, making it a situation-dependent decision.


